A Look at Kube Scheduler Simulator
May 17 2022The Kubernetes ecosystem has expanded at a very good pace in last couple of years. Almost every few months we see a new project being added under kubernetes-sigs. One of the recent projects I’ve come across is kube-scheduler-simulator. If you are looking for understanding how the K8s scheduler works in more detailed way, kube-scheduler-simulator is the perfect project to explore. Simulator helps in visualizing how scheduler works to schedule different pods onto the worker nodes in a K8s cluster. In this blog post, we’ll take a brief look at what kube-scheduler-simulator is and how it works.
kube-scheduler-simulator is a kubernetes-sigs project under sig-scheduling which focuses on visualizing resource creation and scheduling of Pods, nodes, volumes, storageClass, PriorityClass etc. It helps in seeing how does the filter plugins, Score plugins and final score gets applied during the scheduling cycle. In reality, we can’t always know the results of scheduling by just reading logs. And to enable detailed logging, definitely requires a lot more effort and instrumentation than expected. But with kube-scheduler-simulator’s web UI, we can always check which plugin made what decision of scheduling onto what node based on different scheduling scores like Score plugins, Final Score (normalized and applied Plugin weight). Let’s take a look at different kube-scheduler-simulator components:
- etcd
- WebUI
- simulator-server
- kube-apiserver
- pv-controller
- scheduler
- HTTP server
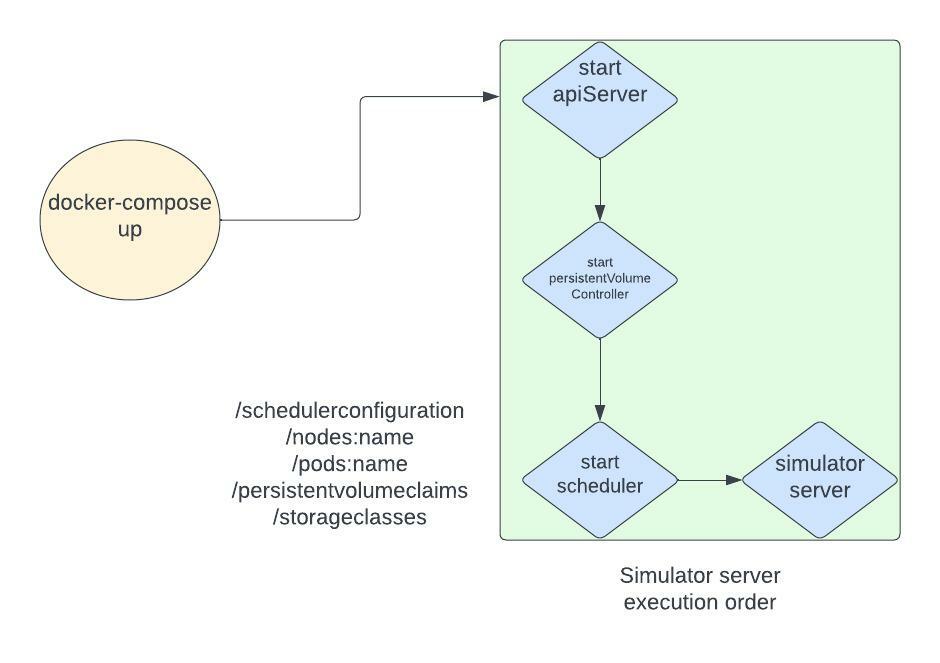
When the simulator server starts, the above mentioned componets are also started along with it. Post that, users can create any of the resources like Nodes, Pods, Storage Classes etc, using clients like kubectl, k8s client lib or web UI. As soon as a new pod is created through kube-apiserver, the scheduler starts scheduling the pod based on some score/filter plugins. Usually, once the score/filter plugins are called, the calculated results are returned to the scheduler. Whereas in simulator, there are custom plugins that calculate the scores, record the result and then send those to scheduler so that the pod can be scheduled. And if everything goes correct, the scheduler then binds pod to the node otherwise, it moves back the pod to the scheduling queue. If you are looking for some more detailed explaination of how K8s scheduler works, check this previous post of mine here.
Here’s the entire process depicted via below image:
One of the more easy to use feature of simulator is to manage resource creation, deletion via Web UI. You can check out how the web UI looks like here. It’s easier to create, delete or update resources like Nodes, Pods, PVs, PVCs, Storage Classes, Priority Classes etc via the webUI. And not just that, once the pod is scheduled onto a node, we can even see the total plugin, filter and final scores.
Let’s check how to quickly get started with scheduler-simulator. There are two ways to run simulator,
- Run using Docker (most preferred way)
- Run it locally, by bringing every component up individually
Looking at the first method of running it via Docker, it’s easier to first clone the github repo locally and then head to where docker-compose.yaml is. You can use the below command to build all the simulator components from ground up
make docker_build_and_up
The simulator can then be accessed at localhost:3000
Another way to run, would involve bringing etcd and simulator server separately. For this, make sure you have Go & etcd installed locally. Link to install etcd here. Head to the simulator directory in root and run the below command:
make start
The scheduler-simulator is a fairly easy project to start with if you want to widen your understanding around how the scheduling takes place for K8s scheduler. If you are looking to contribute to the project, there are many open issues which can be looked at here. The project is a part of K8s sig-scheduling and it’s updates are tracked under the same community call as per schedule. I’ve shared few more links below for the reference as well.